
티스토리 뷰
★ 컴포넌트 렌더링
이 페이지는 "Hello,Sara"를 렌더링하는 예시이다.

1. <Welcome name = "Sara"/> 엘리먼트로 ReactDOM.render()를 호출한다.
( <Welcome/> 은 컴포넌트를 나타내며 범위 안에 Welcome이 있어야함. 컴포넌트 이름은 항상 대문자! )
2. React는 {name: 'Sara' }를 props로 하여 Welcome 컴포넌트를 호출한다.
3. Welcome 컴포넌트는 <h1> 엘리먼트를 반환한다.
4. React DOM은 <h1> 엘리먼트와 일치하도록 DOM을 업데이트한다.
결과는

솨라님을 만나뵙게된다. 안녕하세유.
★ 컴포넌트 합성
컴포넌트는 자신의 출력에 다른 컴포넌트를 참조할 수 있게 해보자.
React앱에서는 버튼, 폼, 다이얼로그, 화면 등의 모든 것들이 흔히 컴포넌트로 표현된다.
Welcome을 여러 번 렌더링하는 APP 컨포넌트를 만들어보자.
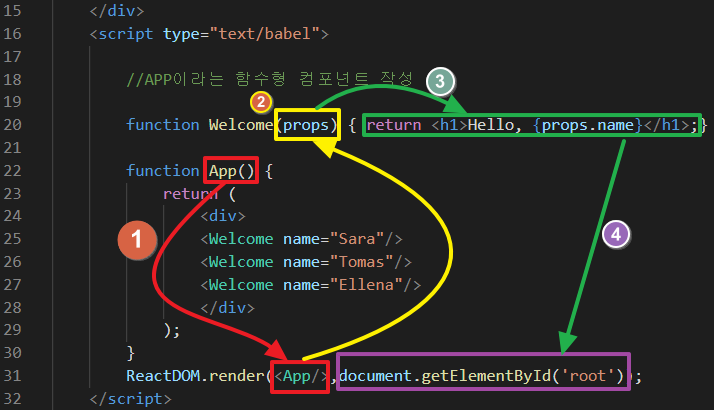
1. <App/> 컴포넌트를 먼저 React.DOM 에 렌더링을 해주는 것이 중요하다.
그 밖의 순서는 위와 같다.

그럼 Sara님만이 아닌 다른 친구들도 만날 수 있다. 안녕하세유.
★ 컴포넌트 추출

이 컴포넌트는 author(객체), text(문자열) 및 date(날짜)를 props로 받은 후 소셜 미디어 웹사이트의 코멘트이다.
React 공식 사이트님께서 제공해주셨다.

이 귀요미 야옹이를 볼 수 있다.
이 컴포넌트는 구성요소들이 모두 중첩구조로 되어있어 변경과 재사용이 어렵다.
이 컴포넌트에서 몇 가지 컴포넌트를 추출해보겠다.
먼저, Avatar를 추출하자.
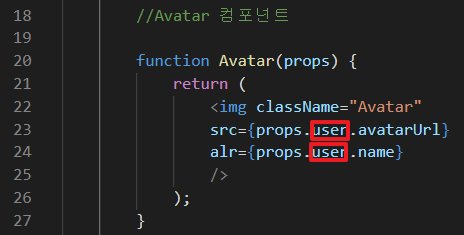
Avatar는 자신이 comment 내에서 렌더링 된다는 것을 알 필요가 없다.
따라서 props의 이름을 author에서 일반화된 user로 변경해도 된다.
props의 이름이 사용될 context가 아닌 컴포넌트 자체의 관점에서 이름을 짓는 것을 권장해줬다. React님이
이 단계로 인해 Comment가 쵸큼 단순해졌다. 다이어트 성공!
다음은 Avatar 옆에 사용자의 이름을 렌더링하는 UserInfo 컴포넌트를 추출하겠다.
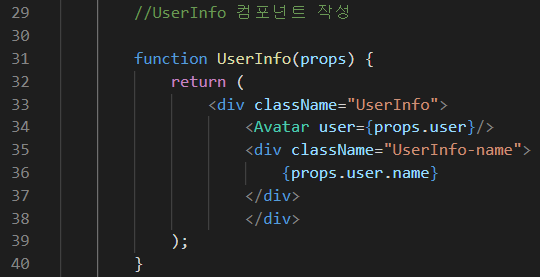
더욱더 다이어트에 성공하고 있는 comment를 볼 수 있다.
<!DOCTYPE html>
<html lang="en">
<head>
    <meta charset="UTF-8">
    <meta http-equiv="X-UA-Compatible" content="IE=edge">
    <meta name="viewport" content="width=device-width, initial-scale=1.0">
    <title>Document</title>
    <script crossorigin src="https://unpkg.com/react@17/umd/react.development.js"></script>
    <script crossorigin src="https://unpkg.com/react-dom@17/umd/react-dom.development.js"></script>
    <script src="https://unpkg.com/@babel/standalone/babel.min.js"></script>
</head>
<body>
    <div id="root"></div>

    <script type="text/babel">
        function formatDate(date) {
         return date.toLocaleDateString();
        }

        //Avatar 컴포넌트
        function Avatar(props) {
            return (<img className="Avatar"
            src={props.user.avatarUrl}
            alt={props.user.name}
            />
            );
        }

        //UserInfo 컴포넌트 작성

        function UserInfo(props) {
            return (
                <div className="UserInfo">
                        <Avatar user={props.user} />
                        <div className="UserInfo-name">
                        {props.user.name}
                </div>
                </div>
            )
        }

        //Comment 컴포넌트
        function Comment(props) {
            return (
                <div className="Comment">
                    <UserInfo user={props.author}/>
                <div className="Comment-text">
                     {props.text}
                </div>
                <div className="Comment-date">
                    {formatDate(props.date)}
                </div>
                </div>
                );
            }

        // 순수 JS 객체(object)
        const comment = {
            date: new Date(),
            text: 'I hope you enjoy learning React!',
            author : {
                name: 'Hello Kitty',
                avatarUrl: 'http://placekitten.com/g/64/64'
            }
        };

        ReactDOM.render(
            <Comment
            date={comment.date}
            text={comment.text}
            author={comment.author}/>,
            document.getElementById('root'));
        // 표현식 안에 넣은 author는 순수 js 객체를 가지고 있는 property
         // Comment 옆에 있는 author는 위 Comment에서 받은 것을 뜻한다.
    </script>
</body>
</html>
이렇게 다이어트에 성공한 Comment는 변경이 쉽고,재사용이 가능한 컴포넌트가 되었다.
이렇게 나는 유능한 트레이너에 한 발짝 다가게 되었다. 화이팅!
'차곡차곡 > Frontend' 카테고리의 다른 글
| [React] 이벤트 처리하기 / 토글 버튼 클릭에 따라 전구 켜기 (0) | 2022.04.17 |
|---|---|
| [React] Props와 State / 리액트로 클릭 카운터 만들기 (0) | 2022.04.17 |
| [React] 엘리먼트 렌더링 - tick 만들기 (0) | 2022.04.17 |
| [React] JSX (0) | 2022.04.15 |
| React를 이용한 Counter 만들기 - (2) (0) | 2022.04.15 |
- Total
- Today
- Yesterday
- React
- React를 이용한 Counter 만들기
- tick 만들기
- JPA
- 리액트 이벤트 처리하기
- DDL 생성 콘솔 출력
- 리액트 엘리먼트 렌더링하기
- 영주 한우
- 커틀렛 맛집
- JPA 기본키 매핑 전략
- 꾸덕꾸덕 파스타 맛집
- 데이터베이스 스키마 자동 생성
- 영속성 관리
- 영주역 맛집
- 온량 서울숲점
- JPA애플리케이션개발코드
- 풍기역맛집
- fragment태그
- 콘솔 창 한글 깨짐
- JPQL이란
- JPA라이브러리
- intellij 한글 깨짐
- 엔티티매니저팩토리
- 엘리먼트 렌더링
- 로제 파스타 맛집
- 토마호크 맛집
- Counter 만들기
- react counter
- pip 설치 오류
- 버튼누르면전구이미지변하기
| 일 | 월 | 화 | 수 | 목 | 금 | 토 |
|---|---|---|---|---|---|---|
| 1 | ||||||
| 2 | 3 | 4 | 5 | 6 | 7 | 8 |
| 9 | 10 | 11 | 12 | 13 | 14 | 15 |
| 16 | 17 | 18 | 19 | 20 | 21 | 22 |
| 23 | 24 | 25 | 26 | 27 | 28 | 29 |
| 30 | 31 |